Friday, May 14, 2010

Bicycle Bag

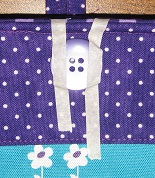
This is the bag I started during Sister Sewing Day. I found this bicycle canvas at the local fabric shop and I HAD to have it. =) I'm not sure who makes it. I think it might be kinda generic. The colors are a little more brilliant than the photo reflects (see button photo below for better reflection of the colors). The camera rarely seems to like dark purples.

In terms of construction, I was not thrilled with this pattern... I think my first clue should have been the multiple modifications to the Quilt Store's sample made from it.

On another note, I wanted to share something great I've discovered lately -- quilter's masking tape! I've been using it a lot to hold interior pockets in place before I sew them on. But on this project, I discovered yet another use for it -- holding buttons in place for sewing!!! In case you didn't guess, I sew my buttons on with the machine and I usually had to hold the button in place until I could get it under the foot. However, this tape method was so much easier. Thought I'd share that great tip!  You should be able to find this tape at your local quilt shop or the quilting aisle at Jo-Anns.


Thursday, May 13, 2010

Stanley Cat Sunning

Stanley is a stuffed cat that my husband and I put together over a year ago. I convinced him to try sewing a project with me, thinking his engineering brain may find it interesting. I don't think that was the case, but we passed some time at least. =) Our dog Bandit, on the other hand, was VERY fascinated with the project. I am sure he wishes this was a toy for him to chew!  In fact, he gave it many hopeful sniffs when we took it outside to photograph it the other day.

Anyhow, as for notes on the project (I don't recall making many changes)...
  • The pattern is "Steve" from the book "Denyse Schmidt Quilts".
  • You might not be able to see, but I sewed a small white button where his bellybutton is (the center of the flower).
  • I left his tail off so I can easily set him on shelves.
  • I love that his eyes are two different sizes. Those red buttons are extras for a navy blue wool coat that I still haven't gotten around to making...
  • He looks like a Stanley to me, so that's what I named him.
  • Be careful if you choose stripes -- be sure to line them up on the panel that makes up his belly area. You'll also have to plan for this when you cut those two pieces out that go on either side of the belly square.

Tuesday, May 11, 2010

Sister Sewing Day


This weekend my Sister made a long drive all the way to my house for some sewing.  I don't get to see her very often so this was a real treat! =)  She didn't have to bring anything but her left handed scissors because I practically have a mini fabric store going on in my sewing room (though my collection doesn't rival some of the overflowing shelves I've seen in Flickr shots!).

I had more fun than I've had in a long time assembling this with her. She picked out this lovely purple and I wanted one just like it after I saw it finished =) It turned out so beautifully!

The project took a little longer than we expected... it didn't help that we were disappointed in some of the pattern's construction methods. We added two handles instead of the one the pattern called for. I had seen this change in the fabric store sample and thought it was a really neat idea.  The handles turned out a little longer than we intended, but a good size for carrying the bag over your shoulder.  We also added a double layer of peltex to create a stiffer bag bottom. We made this as an insert covered in the same fabric as the lining. Needless to say, we now know some better ways of putting it together if we make them again. 

p.s. Mine's not quite done, but I'll get a photo posted as soon as it is.

Friday, May 7, 2010

Backpack Bag


This is the "Day In the Park Backpack Tote" that I made for Trish's Birthday. It's a handy bag that can be used as a tote or a backpack depending on what you do with the straps. 

Here are some notes about what I did in this project:

  • The outside fabric is a cotton/linen blend by Kokka and the inside is cotton from the Park Slope collection.
  • I used canvas and heavy weight (Pellon 50?) interfacing. The pattern noted that you may be able to leave the one of the two out  (can't remember which) if your fabric was heavy enough, but I went for it anyways. I'm glad I did. The bag has good structure.
  • I interfaced the inside zipper pocket so it would have more structure. I used lightweight interfacing for it. I also used a contrasting birdie fabric for the zipper pocket. Not only does it add a little fun, but it's easier to see in the pocket.
  • I added .25" to the sides of the bag so it would be a little roomier. I added this to all the side pieces but forgot to add it to the inside facing. That was a real frustration of re-sewing until I finally realized my mistake....
  • For the outside pocket, I cut it so the fabric pattern would match when sewn onto the main bag panel. I'm really glad I did that. Looks really nice.
  • Added an inch or two in height to the outside pocket. I just felt in needed to be deeper.
  • I learned not to stick the magnetic closure together before attaching it to the bag. Boy was it hard to get it back apart!
  • There are rivets holding the straps around the o-rings. With canvas lining the strap, and it folded over twice (creating 3 layers of strap to rivet through), the rivets came un-done on Trish. I went to a leather supply store and purchased longer rivets in hopes that this fixes the issue. It was so hard to get the rivets through and connected the first time so I'm thinking the strap was just too thick for them to get properly connected.
  • I used the triple stitch setting on my machine to sew the outside stitching on the handles/straps. I thought that would be a good idea since the straps would take a lot of tugging/stretching/abuse.
  • I used my walking foot to sew the bag and I wouldn't do it without it if I were to make this again. I'm positive it helped me avoid major headaches.

Bag Inside with zipper pocket open