Wednesday, December 29, 2010

Cherry Pincushion


This pincushion is made from the pattern "kelly's pincushions" that is in the book "Last-Minute Patchwork + Quilted Gifts".  I made it for my Grandmother's birthday using red and aqua fabrics and aqua floss. I added the button to cover up the string intersections. I topped off the gift with a new set of blue Fons & Porter glass head pins to match.

Project Notes:
  • I stuffed this with Quilters Dream's Sweet Dreams cotton stuffing that I purchased from Purl Soho's website. This stuffing is heavier than poly/synthetic and packs well. I'm glad I used it.
  • I  had a hard time sewing the floss around the cushion seams. Since so many seams meet at the top and bottom, shoving a large needle through that is hard. I would push it through with my thimble and my husband would yank it out with pliers.... I was able to get it through on my own a few times with a little work. Maybe I could have found a needle better suited for this. I just bought one in the isle where I found the floss at the store. (I know nothing about embroidery stuffs.)

Wednesday, December 15, 2010

Sunday, December 12, 2010

45 Down, 45 To Go

I finished piecing 45 of the 90 blocks I need for the Christmas gift quilt I'm making. I was going to post a shot but I thought better of it in case the recipient views my blog.  Instead, I found a fun photo on the camera from early this summer to share.


This is a block from the quilt I was making with a fat quarter bundle I got for my birthday. I pieced all the blocks but have yet to sew them together.  This will be a fun project to get back to after winter has dragged on for too long!

Notes: The pattern for this block is "Megabits" by Swirly Girls Design. The fabric is from Moda's "Make Life..." collection.

Saturday, December 4, 2010

Progress!


Can you smell the smoke coming off my roller cutter? I cut up all but 3 fat quarters of the Fresh Cottons Bundle and four 1/4 yard sections. Phew. They were all prewashed and my husband pressed them all for me. Since it is a gift from both of us, he is helping with what he can.... and all he can help with is ironing. That's fine with me because I HATE to iron. =)

Friday, September 17, 2010

Homemade Baby Shower Invites


I'm hosting a baby shower for my Sister and I thought I'd make the invites as a fun project. It turned out to be a lot more work than I expected but the end result was good. I want to thank my Mother-In-Law for all her help. She visited and brought her Cricut paper cutting machine. She cut out the giraffes with the "Create A Critter" cartridge. The giraffe is actually 3 different cutouts layered and glued on top of each other. She used a different cartridge to cut out the party wording, but I'm not sure which one. I glued everything  to the front of  square invite cards that I bought at Jo-Anns. It costs 20 cents extra to mail square invites so I had to buy 64 cent stamps.


For the inside of the card I found this fun green paper with dots (to carry the giraffe spots to the inside in a way) in the scrapbook isle. I used a nifty Fiskars paper cutter (that I got for half off!) to cut it to the proper size. I was able to get two inserts out of each sheet of paper. I then got on the computer to assemble the inside card text. After many many test runs on plain paper I was finally ready to print. I found that the printing came out best when I set the printer to print "fine" quality and checked the box for "slow drying paper". Then I folded the inserts and glued just the right side/half down in the card.

Off they went in the mail today!

Thursday, July 29, 2010

Purple Hat

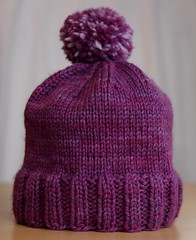
Purple Hat

I haven't knit in quite awhile but I've starting thinking about winter hats already. I LOVE hats. I made this hat in Spring and it is a pretty good second attempt at hat knitting... I've learned that I would like to make a fold up brim next time to help keep the wind from blowing through.  Also, things stretch out some after knit so I would make it a little smaller next time too.

Friday, July 2, 2010

Gnome Pillowcase


My Sister-in-law is coming to stay for the weekend and I know she likes this gnome fabric. She chose it when we did a sewing weekend over my and her Mother's birthday. She sewed one of her first projects ever, making an Amy Butler purse with it. Super cute. We had to interface it for that project though.  I thought it would be fun to add a little jazz to her guest room and to have something to take home with her.

It's made similar in size to a pillowcase I measured from the linen closet and based on the pattern from "Weekend Sewing" by Heather Ross.


Closeup


I made it using a Bernette Serger (or overlock?) that my Mother-in-law gave/lent us. I don't actually know the difference between a Serger and an overlock.... =O I believe the machine is from the 80's and it's built like a tank. I was really afraid of it for a long time since I've never really used a Serger. A year ago my local Bernina dealer was nice enough to let me take their Serger class where they showed me how to thread it but I forgot. After flashlights, manuals, and frustration, I managed to get the thing threaded and now I'm really liking it. I serge all my fabric before I prewash it and I no longer have messy frayed edges. I love this thing!!

Bernette 234 Serger

Ok, I love everything except how fast it goes because I'm afraid I'll lose a finger. The pedal is really easy to push down so it's hard to go slow. So far no injuries!

Sunday, June 27, 2010

Triple Express Runner

I always wanted to make a table runner, but I have a round table. Not quite a good match for those rectangle ones.... I finally had the opportunity when I found out our Neighbor loves table runners. =) I showed her some options and she chose the "Triple Express Runner" from the quilt book Happy Hour by Atkinson Designs. She purchased the fabrics in a home dec weight which made for a sturdy runner.

I thought it was a pretty easy runner. The assembly of the top was really simple the way she designed it-- cutting down one big pieced section into the necessary smaller ones. I've never quilted anything beyond a pot holder so it was my first experience with that. I taped down the backing, put down the batting, then the top and safety pin basted it. I think I could have made the top a little more taught during basting. But it wasn't as hard as I thought. The only part that tripped me up was the binding. I didn't know how to bind corners at that angle. Since they weren't right angles I couldn't do the nice mitered ones. I just went around them without doing anything (treating them like a curve). This worked pretty well until you sew down the binding on the back and end up with some pleates and other unfavorables. It might not be such an issue if you hand sew down the binding in the back, but I did it by machine. I stitched in the ditch on the front and made sure the binding on the bottom would get sewn through.  I did look in the multiple books and online trying to find out how to bind those corners nicely but I couldn't find what I needed. I redid a few of the curves a few times until they looked a little better. The best part about table runners is no one looks at the back....usually. =O

Friday, June 25, 2010

Doggie Dino Pillow

Official Pillow Tester

I made this pillow without a pattern. Our dog kindly separated my wool batting into tiny fluffy pieces ready for pillow stuffing.... probably trying to send me a hint seeing he LOVES our wool pillows. :)  The pillow is made with a natural denim shell that I serged, stuffed and closed.  I then broke out my way cool Michael Miller "Brown Dino Dudes" fabric to make the case. (This fabric also comes in flannel but I thought that would attract too much dog hair.)  The case is what I guess you would call a slip case? I overlapped the fabric in the back so it stays closed but I can remove the "pillow form" when it's wash time.


Tuesday, June 15, 2010

Cupcake Apron


I made this apron for my Grandmother using the Scalloped Apron Pattern by The Paisley Pincushion. The apron is reversible, has darts, three pockets on each side and features a scissor back.

Project Notes:
  • I made this apron in size B.
  • I lined the pockets. I sewed them with right sides together and then flipped them right side out. I thought this made creating the scalloped pockets easier...for me at least.
  • The recipient did not want to reverse the apron so I only put pockets on one side.
  • I thought the pattern was well written and easy to follow.
  • Be sure to clip it really close to the stitching where the scallops meet on the edges of the apron. I had to keep yanking those parts back through the small opening left for turning to re-clip them so they would iron nice and flat.
  • The only thing I wish was different is the amount of fabric used on the scissor back. It's pretty much two layers back there when you are wearing it because each back piece is so large. That's just my ipersonal preference though. As it is, It will definitely keep your clothes clean!
  • Cupcake fabric is "Confections" by Robert Kaufman fabrics.

Front and back view. Click to enlarge.

Friday, May 14, 2010

Bicycle Bag

This is the bag I started during Sister Sewing Day. I found this bicycle canvas at the local fabric shop and I HAD to have it. =) I'm not sure who makes it. I think it might be kinda generic. The colors are a little more brilliant than the photo reflects (see button photo below for better reflection of the colors). The camera rarely seems to like dark purples.

In terms of construction, I was not thrilled with this pattern... I think my first clue should have been the multiple modifications to the Quilt Store's sample made from it.

On another note, I wanted to share something great I've discovered lately -- quilter's masking tape! I've been using it a lot to hold interior pockets in place before I sew them on. But on this project, I discovered yet another use for it -- holding buttons in place for sewing!!! In case you didn't guess, I sew my buttons on with the machine and I usually had to hold the button in place until I could get it under the foot. However, this tape method was so much easier. Thought I'd share that great tip!  You should be able to find this tape at your local quilt shop or the quilting aisle at Jo-Anns.


Thursday, May 13, 2010

Stanley Cat Sunning

Stanley is a stuffed cat that my husband and I put together over a year ago. I convinced him to try sewing a project with me, thinking his engineering brain may find it interesting. I don't think that was the case, but we passed some time at least. =) Our dog Bandit, on the other hand, was VERY fascinated with the project. I am sure he wishes this was a toy for him to chew!  In fact, he gave it many hopeful sniffs when we took it outside to photograph it the other day.

Anyhow, as for notes on the project (I don't recall making many changes)...
  • The pattern is "Steve" from the book "Denyse Schmidt Quilts".
  • You might not be able to see, but I sewed a small white button where his bellybutton is (the center of the flower).
  • I left his tail off so I can easily set him on shelves.
  • I love that his eyes are two different sizes. Those red buttons are extras for a navy blue wool coat that I still haven't gotten around to making...
  • He looks like a Stanley to me, so that's what I named him.
  • Be careful if you choose stripes -- be sure to line them up on the panel that makes up his belly area. You'll also have to plan for this when you cut those two pieces out that go on either side of the belly square.

Tuesday, May 11, 2010

Sister Sewing Day


This weekend my Sister made a long drive all the way to my house for some sewing.  I don't get to see her very often so this was a real treat! =)  She didn't have to bring anything but her left handed scissors because I practically have a mini fabric store going on in my sewing room (though my collection doesn't rival some of the overflowing shelves I've seen in Flickr shots!).

I had more fun than I've had in a long time assembling this with her. She picked out this lovely purple and I wanted one just like it after I saw it finished =) It turned out so beautifully!

The project took a little longer than we expected... it didn't help that we were disappointed in some of the pattern's construction methods. We added two handles instead of the one the pattern called for. I had seen this change in the fabric store sample and thought it was a really neat idea.  The handles turned out a little longer than we intended, but a good size for carrying the bag over your shoulder.  We also added a double layer of peltex to create a stiffer bag bottom. We made this as an insert covered in the same fabric as the lining. Needless to say, we now know some better ways of putting it together if we make them again. 

p.s. Mine's not quite done, but I'll get a photo posted as soon as it is.

Friday, May 7, 2010

Backpack Bag


This is the "Day In the Park Backpack Tote" that I made for Trish's Birthday. It's a handy bag that can be used as a tote or a backpack depending on what you do with the straps. 

Here are some notes about what I did in this project:

  • The outside fabric is a cotton/linen blend by Kokka and the inside is cotton from the Park Slope collection.
  • I used canvas and heavy weight (Pellon 50?) interfacing. The pattern noted that you may be able to leave the one of the two out  (can't remember which) if your fabric was heavy enough, but I went for it anyways. I'm glad I did. The bag has good structure.
  • I interfaced the inside zipper pocket so it would have more structure. I used lightweight interfacing for it. I also used a contrasting birdie fabric for the zipper pocket. Not only does it add a little fun, but it's easier to see in the pocket.
  • I added .25" to the sides of the bag so it would be a little roomier. I added this to all the side pieces but forgot to add it to the inside facing. That was a real frustration of re-sewing until I finally realized my mistake....
  • For the outside pocket, I cut it so the fabric pattern would match when sewn onto the main bag panel. I'm really glad I did that. Looks really nice.
  • Added an inch or two in height to the outside pocket. I just felt in needed to be deeper.
  • I learned not to stick the magnetic closure together before attaching it to the bag. Boy was it hard to get it back apart!
  • There are rivets holding the straps around the o-rings. With canvas lining the strap, and it folded over twice (creating 3 layers of strap to rivet through), the rivets came un-done on Trish. I went to a leather supply store and purchased longer rivets in hopes that this fixes the issue. It was so hard to get the rivets through and connected the first time so I'm thinking the strap was just too thick for them to get properly connected.
  • I used the triple stitch setting on my machine to sew the outside stitching on the handles/straps. I thought that would be a good idea since the straps would take a lot of tugging/stretching/abuse.
  • I used my walking foot to sew the bag and I wouldn't do it without it if I were to make this again. I'm positive it helped me avoid major headaches.

Bag Inside with zipper pocket open