Tuesday, December 25, 2012

Quilt: Three Christmases in the Making


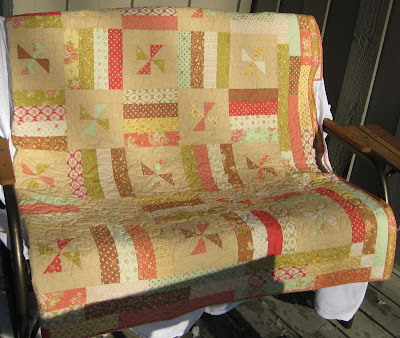
This is the quilt front. The quilt is made from the pattern "Summer Breeze" from the book "Scrap-Basket Surprises". I did add more blocks to my quilt to make it bigger. It is probably queen size. This is my first real quilt and it was made for my parents-in-law. I made a quilt when I was in high school that was much smaller and a disaster, so I don't really count it.


This is the back. I like more contemporary quilts so I had some fun back here.


This closeup of the back allows you to see some of the quilting stitch pattern. I had it professionally quilted. There was no way I was going to try and quilt my "first" quilt on my sewing machine.


I sure hope they love it!

Saturday, December 22, 2012

Italian Card Set - Rosie Posie


Our friend's Mother In Law is visiting from Italy so we thought we'd make her a small gift. She does not speak English, so I made sure to use my Italian Language stamps from PTI. Wow, those were really handy to have on hand and they are only $5! I originally bought them to make my friend a set of thank you notes.

Anyhow, on to the design. I was heavily inspired (and practically copied) these gorgeous cards by Maile Belles from the PTI design team.  All the stamps (except for Italian words) came from PTI's Rosie Posie stamp set. The hexagons come in a strip that has 5 hexagons. My only huge gripe is that on every other row, you need to stamp offset from the previous and you are one hexagon short on a 4.25" wide card. So then you have to ink up on hex on the strip and try and line it up to complete your row. I really wish they had put SIX hexagons on that stamp strip. Would have saved SO much time.  The outer and inner hexes are stamped separately. So this is a pretty time consuming card.  Fortunately, my husband is a great helper. He will pop the ink cover on and off and hold things and place, and whatever I need. He is the best, plus it also makes the gift from BOTH of us! =)  Here are some more cards in the set (each one we made different).


* Grazie = Thank You, Buon Compleanno = Happy Birthday, Ciao = Hello

Supplies:

Wednesday, December 12, 2012

Blue Floral Napkin Set


Fabric: Madrona Road Wild Carrot from Michael Miller Fabrics
 

Tuesday, December 11, 2012

Paisley Dinner Napkin Set


I've been in the sewing room non-stop lately trying to get through my very long list of Holiday Gifts. I even have my list prioritized --making gifts that need to be shipped first. Here is one of my completed projects, a set of 8 dinner napkins with mitered corners.
 
Fabric is from Art Gallery Fabrics in a paisley print from the Gipsy Glitter collection.
 

Sunday, November 18, 2012

Sarah's Two Button Hat


I made this for my Sister-in-law who just graduated college.  I knit this from Blue Sky Alpaca's Two Button Hat Set. The yarn is also theirs. It is their Worsted Hand Dyes in "green".
 .

Wednesday, November 14, 2012

Mitered French Dinner Napkins & Matching Card


I have a good friend who I made these napkins for as a Birthday gift. One of her many languages is French so I chose French themed fabric. They turned out SOOO beautiful. I wanted to keep them for myself! I made a set of 8. Five Eiffel Tower, and 3 French newsprint.


All napkins had these amazing (if I do say so myself) mitered corners that I recently learned how to do.


To top it off, I used the fabric as inspiration to make a coordinating birthday card! The Eiffel Tower and greeting were printed from Microsoft office onto white card stock. I then used distress ink on a sponge to distress it and cover the white. I used some Papertrey Ink stamps to help bring in some design elements from the fabric.  I used dots, a butterfly, script text, and a hexagon. It turned out just perfect! (sorry for the bad photo lighting, it was night time!)

Friday, September 7, 2012

Father's Day Card


This is a card I made for Father's Day this year. The Owl's are from the Cricut Lite Cartridge "Hoot 'n Hollar". Circle background and sentiment stamps are PTI. Cute gingham paper is from Amuse Studio.

Baby Card


A friend asked me to make a baby card for her and this is what I came up with.

Thursday, July 26, 2012

Merci Card Set


Materials:
Paper: Plum Pudding solid cardstock from PTI (Papertrey Ink), Spring Moss solid cardstock from PTI; floral paper from JoAnns, Dark purple for butterflies is unknown.
Stamps: Merci from one of the Think Big Favorite Sets from PTI.
Ink: Colorbox Pigment in Violet, clear embossing powder
Dies: Cuttlebug/ProvoCraft butterfly die with matching embossing folders, envelope liner die from PTI
Card Box/Gift Box Template from PTI. The template is called "All Boxed Up"

Sunday, June 10, 2012

Cowboy Birdie (using Cricut 3 Birds on Parade)


My Dad lives in the southwest so I thought this would be a great Birthday card for him. I used the 3 Birds on Parade Cricut cartridge to make the cowboy bird.  I cut the cactus by hand after sketching one.  I used my Papertrey Ink Meadow die to cut the dirt. I stamped the clouds with white ink.


I used my zippers die from Papertrey Ink. Hidden behind that panel is a gift card. He will need to pull the tab to open it and get the card. I thought it made the card more fun and interactive.

Wednesday, May 23, 2012

PTI Global Greetings Thank You card


I got a set of Italian stamps from the last Papertey release that I put to good use. This is a thank you card I made for some special people! I used red embossing powder and ink on the poppies.

Stamps: Papertrey Ink Global Greetings Italian and Botanical Silhouettes

Monday, May 21, 2012

Birthday Calendars (Magnet Style)


I saw these adorable magnetic birthday calendars on Lisa Johnson's blog. I made them for Mother's Day gifts this year. Here is a small sample of them. This set has a pink one as well that isn't shown (same color as the hearts shown). I found the four bright and fun papers at Hobby Lobby and are made by The Paper Studio. On Lisa's blog, you can get instructions and the calendars to print. I printed the calendars on white cardstock and cut them out. It takes two sheets of white (or whatever color you choose).  The whole thing is mounted on paper coasters (I purchased mine at papertreyink.com) with magnets attached to the back so you can stick them to your fridge. So clever!


So, if you are in need of some cute gifts to have on hand, check these out on Lisa's blog!

Monthly Birthday Calendar (Clipboard Style)


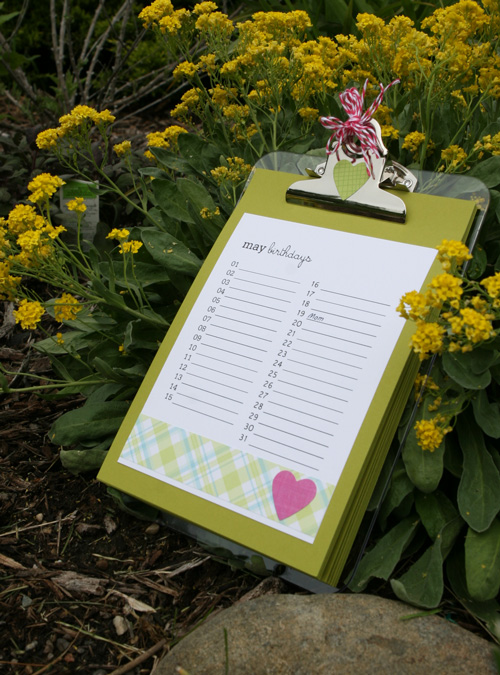
I found these great birthday calendars on the Eighteen25 blog and I knew they would make great gifts! They provide the calendar files on their site so you can download them and print them out. Then, you can embellish them however you choose!

I took their calendar files and edited them in Photoshop Elements so I could type the Birthday's on the Calendar. (The page shown just has "Mom" on the 19th.) I then printed them on white cardstock and mounted them on Simply Chartreuse cardstock from PapertreyInk (PTI).

I ordered a pack of clear clipboards on Amazon.com because I could not find the small size in the store. I used my heart dies from PTI to cut the hearts. The plaid paper is from Jo-Anns or Michaels and is Recollections "Green & Blue Plaid". It matches Simply Chartreuse nicely.

If you make some, be sure to leave the margin at the top of your mounting paper bigger than the bottom so it still looks balanced after it is under the clip.
...

Sunday, May 20, 2012

Christmas Card Set


My Mother-In-Law loves Nativity sets. She has several small ones she sets out during Christmas. When I saw these gorgeous cards that Betsy Veldman made for a Papertrey Ink Make-It-Monday, I knew they would be perfect for her!!!!  I'm pretty new to stamping so this was a huge undertaking and it started off a bit shakey, but it turned out AMAZING. I was able to finish a small set and package them beautifully using PTI's All Boxed Up Template. When all is said and done, she will have FIFTY, yes, fifty, beautiful cards to send this Christmas. And I will be passed out from all that stamping! =)

I had a hard time learning to use the ink blending tool to antique the edges of the die cuts and I messed up several before I got the hang of it. After the fact, I found this great youtube video from Two Peas In A Bucket that shows how to use it. So hopefully that will help the rest of you out there who haven't used that tool yet. I didn't use the green ink in the antiquing process like on the Make-It-Monday video. I tried it but I didn't like how it looked. I think it didn't look good because I was mounting it on green cardstock and it really pulled the green out of the die cut. So I only used the tea dye and walnut stain.  I also lined up my sentiments a little differently on the die cuts because I wanted to be able to read more of the words in the background than in the Make-It-Monday versions.

I also had a frustrating time with the inks. I ordered Smokey Shadow ink from PTI to so I could stamp the silhouettes to match the cardstock strip that runs under the die cuts. However, their ink dries to a dark brown...not a light black/deep gray tone. There is even a discussion about it on the forum. So I had to find something else. I tried black pigment ink from Colorbox but it took FOREVER to get good coverage on the stamp and, even if I heat set the ink, it still would smudge on my finished product. I had to trash several finished die cuts because of that. I finally found Ranger's Pitch Black pigment ink that didn't smear after it was dried, and gave a quick good coverage on the stamp. The "shade" of black also went well with the smokey shadow cardstock strip.


Here is the All Boxed up "box" I made from the template. It really made my project something special and I'll be using it many more times. It packages any card set to beautifully.  The stamped scene on the front was heavily influenced by this lovely nativity card stamped on craft card stock by Nichole Heady.


Here is the box all closed up and tied shut with the ribbon.

They cards turned out gorgeous, but they took a lot of supplies and the cost really added up. For the most part, I had to buy three stamp sets that can only be used for Christmas and pretty much for people who are Christian since it is Jesus and Bible verses (so it can be limiting). Though the Silent Night sentiment set had a beautiful flourish you can use for pretty much anything...and I have been. =)

Materials

Friday, May 4, 2012

Thank you card in purple


I made this card for a special family. 

Wednesday, April 25, 2012

Papertrey April Blog Hop Challenge


I used my new Daydreamer stamp set from Papertrey Ink to create this floral thank you card. The partial postage stamp came about as an accident. I was trying to stamp two flowers in a scalloped rectangle but I didn't like how it looked so used my paper trimmer to cut one out and thus ended up with what you see here. It was a happy accident I suppose. =)  I first inked the flowers with Pink, and then dabbed the stamp edges on the Razzberry pink to get the two-toned look.

Materials:
PTI cardstock in Spring Moss& Stampers Select White. Not sure where the blue is from.
Stamps: PTI Daydreamer and one of the Think Big Favorites that contains "Thank You".
Ink: Colorbox Pigment in Razzberry, Pink, and Black.  Memento Dye ink in Bamboo Leaves.
Dies: Spellbinders scalloped rectangles
Other: Clear embossing powder for flower and thank you.

Thursday, March 29, 2012

Floral Thinking Of You Card


I made this card for one of my Aunts.  I got as far as the flower framed by the green scallops...then I couldn't find a colored card color it looked good with. Putting it on pink was just too much and white was too plain. I finally decided to stamp cursive text in a lighter green on a white card. I really like how it turned out!

Materials:
Ink: ColorBox Pigment ink in Razzberryand Fresh Green for flower. Memento Dye Ink in New Sprout for script text.
Embossing Powder: Ranger Holographic
Dies: Envelope Liner Die from PTI, Scalloped Rectangles Nestability from Spellbinders
Stamps: Papertrey Ink Stamps: Flower Fusion #10, Text Style
Paper: Papertrey Ink: Stampers Select White, New Leaf for card. Envelope Liner is some pink paper from JoAnns.

Tuesday, January 10, 2012

Guest Bath Curtains


We had guests coming to stay, and since we had put plastic over the windows, I decided we needed some curtains. The plastic keeps out the winter drafts (and my Husband did such a good job you can hardly tell it's there!), but it traps the mini-blind controls behind it. I left the blinds half open to let the sun in but I thought that a little more privacy would be a good idea.

If you notice on the right, the shower curtain is pretty busy so I wasn't sure at first what would compliment them. I obviously couldn't make the curtains out of all patterned fabric or it would be too wild.  I settled for  a patterned section at the top only, and solid fabric for the rest. I searched my stash and found this medallion fabric that looks like it was made to go with the shower curtain! How lucky was that?!  I threw in an orange accent stripe to transition from the pattern into the plain linen.  They turned out great, except they don't bunch well when pulled aside because that strip is a few layers thick, making a stiff line across the curtains. I guess you always learn something when you make a project without a pattern...


A close-up of the top of the curtains.
.